
 | This picture shows the attaching of the Cee shaped attaching channel. the attaching channel may attach on the eave or to a wall. This channel carries half of the covers load so attach it securely. - Cut wall attachement Cee to length. Level extrusion and mark position.
- Before attaching the Cee channel to the house find where the rafters (eave attachment) or studs (wall attachment) are located. Mark on the back fascia where the attachment points are and drill holes in the fascia for the attachment screws (wood) or drive pins (masonry). Your Channel should attach to the house at least every 16".
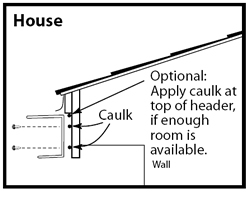
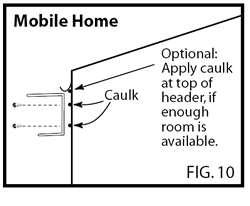
- Run two beads of caulk along the back surface of the "C" channel where it will meet the existing building or fascia board.
- If attaching to a masonary wall, use one 1/4" diameter masonry anchor every 12" on center. (Special fasteners for attaching to brick or other non-wood surfaces are not included should be purchased locally. )
- Raise the fascia to the attachment point and fasten one end to the house. (Make sure screws go into rafters or studs at least 1 1/2")
- Place a long level in the center of the fascia, raise the end not fastened until it is level then fasten to house.
- Continue fastening to every rafter, stud or every 12" OC.
 House Eave Attachment image House Eave Attachment image- House Wall Attachment image
- Mobile Home Attachment image
|
|
 | Post and beam- Measure and cut the posts and front support beam. MEASURE CAREFULLY to achieve the proper slope (at least 6") for water drainage, making sure the top of the beam is level.
- This picture shows the post and beam in place. In this case it is at the panel’s length (projection) less 1' to create a 1' overhang.
- Support Post should be sunk in the ground 2' and set in concrete or attached to the patio slab using brackets and fasteners provided.
- See beam attaching pictures for the different types of beams and their uses.
|
|
 | Get Ready for Panel Installation - Place the first panel in position with the female side facing the outward perimeter of the cover.
- Slide the panel into the attachment Cee
- Check the panel for square and the post for plumb before fastening the panel down to the front attachment.
- (If one of the panels has a fan beam molded in be sure it goes where you want it.)
- The first panel is the key, if it is in square and the post straight up and down (plumb) the rest are easy.
- HINT: after attaching the first panel, temporarily attach a (piece of wood, metal etc...) on the opposite end of the cover from your first panel. Screw down to the back attachment to the front beam. This will hold the front beam in place as you install the other panels and allow you to square up your front beam.
|
|
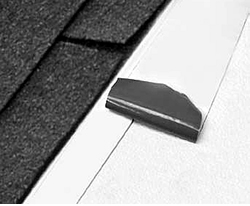
 | Securing Roof panel to the attaching channel. - Using the 1/2" or 3/4" hex head sheet metal screws provided. Screw the panel in place every 8" on center.
- I use two screws on the top to hold the panel until I get them all in then I go back and fill in the missing screws. Or you can do them as you go.
- caulking the panel end before sliding it into the channel gives you a good seal. You can caulk it again later or use sealing tape.
- If you are walking on the roof, stay near the beam or near the attaching channel end - do not walk on the seams.
- larger image
|
|
 | Panel Installation at the beam - Recheck the square on each panel, and check that the post are plumb.
- Drill a hole for a bolt or use the self tapping screws. whichever have been provided. Large special use sealing washers have been provided for the top side.
- Use a fastner every 18" minimum - three per panel.
- (drawing shows optional I-Beam with roof bolt)
- larger image
|
|
 | Panel Attachment - Run a bead of caulk down the top channel of the male side in the sealant reservoir as shown. Make sure there are no air bubbles/pockets when applying sealant.
- Insert the second panel into the header Cee channel in a level position with the starter panel. Be careful not to scratch the underside of the second panel on the front beam.
- larger image
|
|
 | Install remaining roof panels - Postition panel. Bump panel together until it snaps, bumping from header to overhang. Panels should be snapped together fairly soon after caulking is applied.
- Secure panel to attachment Cee and beam as show above.
- Important: After placing each panel into position to lock with previousely laid panel, check to be sure the panel ends are even with each other. After the panels have been locked together it is difficult to slide the locked panels for adjustment.
- Re-check the distance the beam is out from the house and re-check for plumb as you go. Errors in distance and plumb are hard to fix.
|
|
 | Roofing - Repeat steps to install remaining panels until finished.
- The last panel should be cut to size before installing.
- After installing all roof panels, run a bead of caulk where the top edge of the wall header meets the attaching Cee.
- You will find that it goes quickly and smoothly if you take your time.
- We have provided seam tape to go over all seams so that caulking will not be so critical and to provide additional leak prevention.
- IMPORTANT NOTE: If walking on the panels, care should be taken in not stepping directly on the seams. It may affect the seal and on longer spans the deflection of the panel can distort the Snap-NLock profile to the point of showing a dent on the bottom side. When working on the panels, it is also
suggested that a piece of foam is used to kneel on to prevent denting.
|
|
 | Fascia trim or Gutter - Your unit will have either a front drip fascia or a gutter.
- Cutting holes and attaching downspout outlets on the bottom of the gutter may be easier done before the gutter is attached. However, they can be easily installed after the unit is up. One downspout per 100-150 square feet of cover is sufficient.
- Drill a weep hole on each end and in line with roof panel seams (every 2 or 4 ft.) on the underside of drip edge.
- larger image
|
|

 | Install gutter extrusion - Cut front gutter extrusion to exact width of roof plus 1/8".
- Run a heavy bead of caulking along upper inside edge of extrusion.
- Slip the extrusion over the end of the panels starting at one
end and working the extrusion down the width of the roof. - Application can be done from the roof or a ladder.
- A thin putty knife will facilitate application if the fit is tight.
- Using tek screws at 12" intervals, secure extrusion to the roof front.
- Seal edges with 3" or 4" Flex-Seal Tape and/or caulking.
- Install downspouts (if included) after installing side valence
- Install side valence (see below)
- larger image 1
- larger image 2
|
|
 | Install fascia trim (installations without gutter extrusion) - Cut front fascia trim to exact width of roof plus 1/8".
- Run a heavy bead of caulking along upper inside edge of extrusion.
- Slip the extrusion over the end of the panels starting at one
end and working the extrusion down the width of the roof. - Application can be done from the roof or a ladder.
- A thin putty knife will facilitate application if the fit is tight.
- Using tek screws at 12" intervals, secure extrusion to the roof front.
- Seal edges with 3" or 4" Flex-Seal Tape and/or caulking.
- install side fascia trim (see below)
- larger image
|
|
 | Valence / Fascia trim installation - Both the valance and fascia trim fit to the outside of the front extrusion.
- At the end closest to existing structure, cut valance/fascia at appropriate angle to allow for slope of roof.
- At the opposite end, to allow for gutter or fascia trim, cut out the flanges 4-3/4".
- Due to the advanced design of the Snap-N-Lock panel, it is almost impossible for the panel seams to leak. As in any aluminum roof structure, the most critical point is where the header meets the support wall. For best results counterflashing and flex-seal tape should be used as shown in the diagrams below.
- larger image 1
- larger image 2
|
|
|
|
 | Flex-Seal Sealant Tape Header - Panel Connection The tape provides added protection in this critical area and performs like
flashing. It also bonds instantly and protects immediately. |
|
 | Flex-Seal Sealant Tape Panel Connection at Gutter/Fascia
The tape remains flexible, moving with the varying metals of the panel and extrusion as they expand and contract. No fishmouths will form and the bond will remain unaffected. Water will drain right off the roof. |
|
 | Flex-Seal Sealant Tape Panel Seams
Flex-Seal provides a more long-term solution to leaks. The white backing provides superior UV protection. The adhesive remains stable even in very hot or cold temperatures. |
|
|